
A few months ago I found a really cool feature while exploring Lee Robinson's blog, VP of Developer Experience at Vercel. He connected the NextJS blog with his Spotify account and I was very curious about this integration. Fortunately, like this blog, all the code was open on Github. Well, you can freely explore the repository (and I recommend it) or for now follow this article and understand how it works.
First of all, based on simple REST principles, the Spotify Web API endpoints return JSON metadata about music artists, albums, and tracks, directly from the Spotify Data Catalogue. Using NextJS we can create a simple server-side application that accesses user related data through the Spotify Web API.
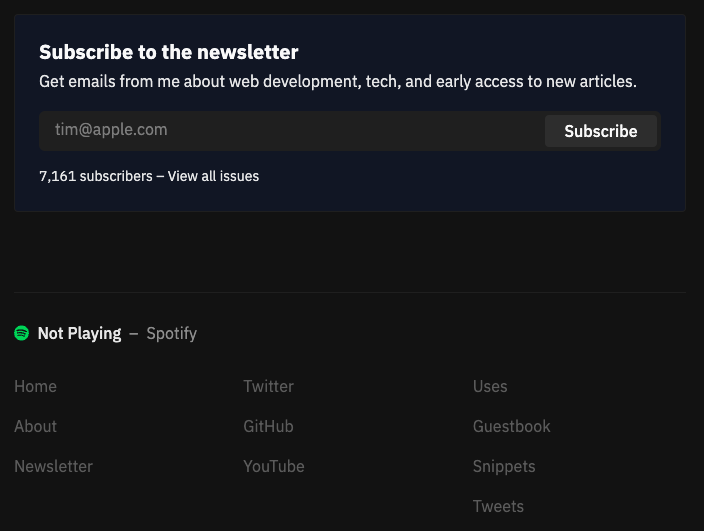
I don't want to talk about CSS or any other styling. The purpose of this article is to quickly teach you how to make this connection and get to this point:
Steps
- Create a Spotify App;
- Authentication and authorization;
- Using Spotify API
- Creating an API Route
Create a Spotify App
First, we need to create a Spotify application to give us credentials to authenticate with the API:
- Go to your Spotify Developer Dashboard and log in.
- Click Create an App.
- Fill out the name and description and click create.
- Click Show Client Secret.
- Save your Client ID and Secret. You'll need these soon.
- Click Edit Settings.
- Add http://localhost:3000 as a redirect URI.
And that is it! Uhul! 🤘
Authentication with refresh_token
There are many types of authentication, but we are going with refresh_token because we only want to authenticate once.
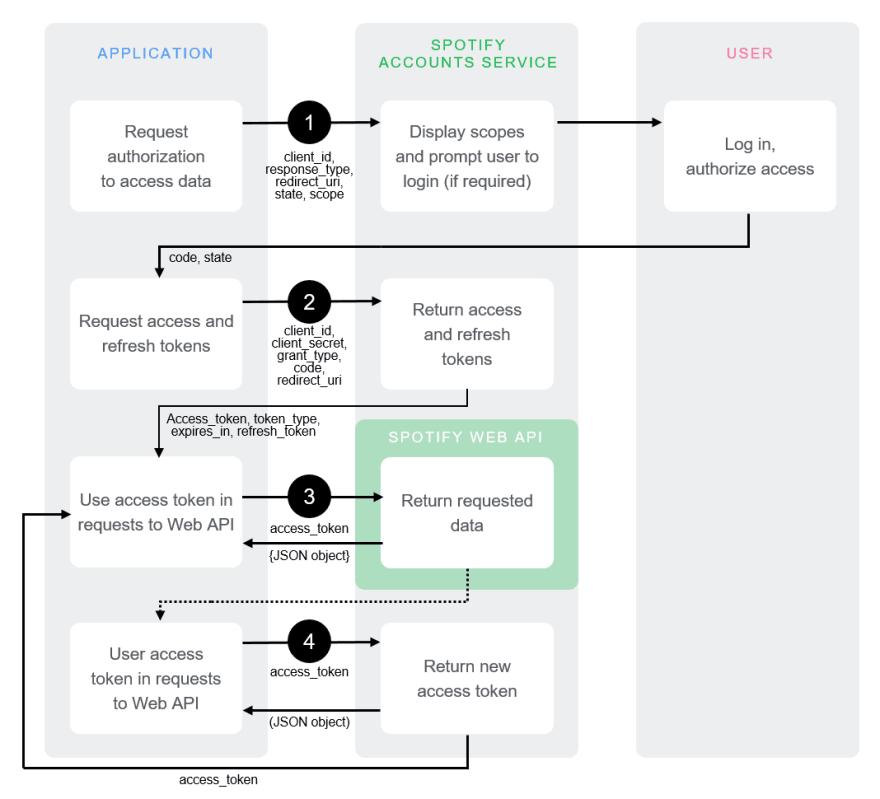
Authorization Code
As you can see in the above image we have everything except scopes. Scopes defines what we need fetch from the Spotify API. We'll have our application request authorization by logging in with whatever scopes we need. Here's an example of what the URL might look like. Don't forget to swap out the client_id and scopes for your own:
https://accounts.spotify.com/authorize?client_id=8e94bde7ddb84a1f7a0e51bf3bc95be8&response_type=code&redirect_uri=http%3A%2F%2Flocalhost:3000&scope=user-read-currently-playing%20user-top-read
After that, if everything is okay, you'll be redirected back to your redirect_uri. In the URL, there's a code query parameter. Save this value!
http://localhost:3000/callback?code=NApCCg..BkWtQ
Now, we'll need to retrieve the refresh token. In this case, you'll need to generate a Base 64 encoded string containing the client ID and secret from earlier. You can use any tool to encode it online. The format should be client_id:client_secret. Some suggestions:
Then,
curl -H "Authorization: Basic <base64 encoded client_id:client_secret>"
-d grant_type=authorization_code -d code=<code> -d redirect_uri=http%3A
%2F%2Flocalhost:3000 https://accounts.spotify.com/api/token
This will return a JSON response containing a refresh_token.
Important: This token is valid indefinitely unless you revoke access, so we'll want to save this in an environment variable.
Using Spotify API
To make our life easier and make the code cleaner, create environment variables for: SPOTIFY_CLIENT_ID, SPOTIFY_CLIENT_SECRET and SPOTIFY_REFRESH_TOKEN. If you've never worked with NextJs environment variables before, read this.
We can now request an access token using our client ID, client secret, and refresh_token.
// lib/spotify.js

import querystring from 'querystring'

const client_id = process.env.SPOTIFY_CLIENT_ID
const client_secret = process.env.SPOTIFY_CLIENT_SECRET
const refresh_token = process.env.SPOTIFY_REFRESH_TOKEN

const basic = Buffer.from(`${client_id}:${client_secret}`).toString('base64')
const TOKEN_ENDPOINT = `https://accounts.spotify.com/api/token`

const getAccessToken = async () => {
  const response = await fetch(TOKEN_ENDPOINT, {
    method: 'POST',
    headers: {
      Authorization: `Basic ${basic}`,
      'Content-Type': 'application/x-www-form-urlencoded'
    },
    body: querystring.stringify({
      grant_type: 'refresh_token',
      refresh_token
    })
  })

  return response.json()
}
Use this access_token to securely request your top tracks. This assumes you added the user-top-read scope at the beginning.
// lib/spotify.js

import querystring from 'querystring'

const client_id = process.env.SPOTIFY_CLIENT_ID
const client_secret = process.env.SPOTIFY_CLIENT_SECRET
const refresh_token = process.env.SPOTIFY_REFRESH_TOKEN

const basic = Buffer.from(`${client_id}:${client_secret}`).toString('base64')
const NOW_PLAYING_ENDPOINT =
  'https://api.spotify.com/v1/me/player/currently-playing'
const TOP_TRACKS_ENDPOINT = 'https://api.spotify.com/v1/me/top/tracks'
const TOKEN_ENDPOINT = 'https://accounts.spotify.com/api/token'

const getAccessToken = async () => {
  const response = await fetch(TOKEN_ENDPOINT, {
    method: 'POST',
    headers: {
      Authorization: `Basic ${basic}`,
      'Content-Type': 'application/x-www-form-urlencoded'
    },
    body: querystring.stringify({
      grant_type: 'refresh_token',
      refresh_token
    })
  })

  return response.json()
}

export const getNowPlaying = async () => {
  const { access_token } = await getAccessToken()

  return fetch(NOW_PLAYING_ENDPOINT, {
    headers: {
      Authorization: `Bearer ${access_token}`
    }
  })
}

export const getTopTracks = async () => {
  const { access_token } = await getAccessToken()

  return fetch(TOP_TRACKS_ENDPOINT, {
    headers: {
      Authorization: `Bearer ${access_token}`
    }
  })
}
Creating an API Route
Let's test our communication with Spotify. First, create a new file at pages/api/now-playing.ts. Then, import the new function getNowPLaying.
// pages/api/now-playing.ts
import type { NextApiRequest, NextApiResponse } from 'next'
import { getNowPlaying } from '../../lib/spotify'
export default async function handler(
req: NextApiRequest,
res: NextApiResponse
) {
const response = await getNowPlaying()
if (response.status === 204 || response.status > 400) {
return res.status(200).json({ isPlaying: false })
}
const song = await response.json()
if (song.item === null) {
return res.status(200).json({ isPlaying: false })
}
const isPlaying = song.is_playing
const title = song.item.name
const artist = song.item.artists.map(_artist => _artist.name).join(', ')
const album = song.item.album.name
const albumImageUrl = song.item.album.images[0].url
const songUrl = song.item.external_urls.spotify
res.setHeader(
'Cache-Control',
'public, s-maxage=60, stale-while-revalidate=30'
)
return res.status(200).json({
album,
albumImageUrl,
artist,
isPlaying,
songUrl,
title
})
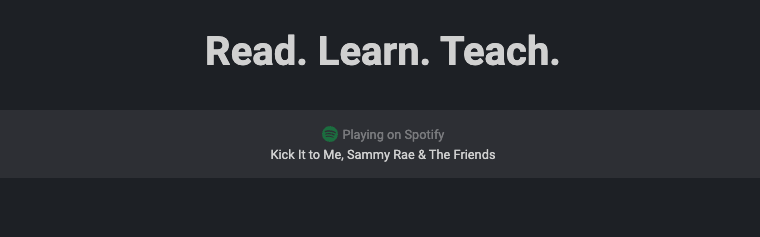
}This returns all the song details if the user is playing the song. Otherwise, isPlaying will return false. You can handle both the conditions now. If the user is playing the song, then simply show the song otherwise display “Not Playing”.
{
  "album": "Once Upon a Time in the West",
  "albumImageUrl": "https://i.scdn.co/image/ab67616d0000b2731cb8ebda56d3dc6f926b1783",
  "artist": "The White Buffalo",
  "isPlaying": true,
  "songUrl": "https://open.spotify.com/track/6p2yQve5trvfSlpIsMLYiS",
  "title": "Stunt Driver"
}
Conclusion
Done! Now just pass this information to the interested components and be happy huhu. Any questions or suggestions, please let me know.